There are a lot of different Roblox Studio test options available to developers. At the most basic is the ability to jump into your game with your avatar and play. But did you know you can launch a test server and simulate having up to 8 players in your game? That can provide valuable test information.
Roblox Studio also allows you to test the game with different languages if you’re trying to release your game to different geographical regions. There is even a team test option where you can test the game with other developers you’re working this.
Understanding each one of these options will increase your chances of releasing a game with very few bugs. The fewer bugs you have, the happier your players are, the more successful your game can be. Let’s dive right in.
Roblox Studio Test Tab
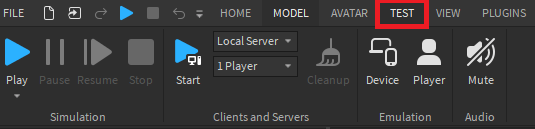
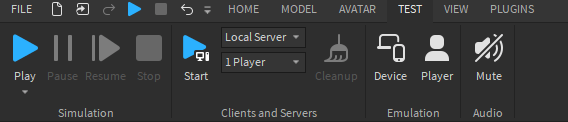
The Roblox Studio test tab provides you with the most testing options for your game. Within the test tab you will find four categories: simulation, client and servers, emulation, and audio.
The test tab is the only place you can test using client and servers or emulation.
Simulation Playtest Options
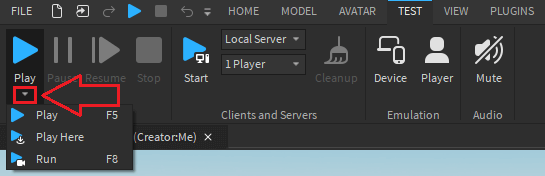
The big blue sideways triangle above the word play would run a Playtest. This playtest option is also found on the Home tab.
Underneath the playtest button you will see a small arrow. Clicking that opens up the playtest options. While you might not even need to use these options it’s good to know they are available.
| Action | Shortcut | Description |
|---|---|---|
| Play | F5 | This will run a simulation of your game. Your avatar will be added to the game at a SpawnLocation or coordinates around (0, 100, 0) |
| Play Here | This will run a simulation of your game. Your avatar will be added to the game in front of the camera’s current positon in the 3D viewport | |
| Run | F8 | This will run a simulation of your game. Your player avatar will not be added to the game. The game starts at your current camera position and you will control your camera like normal in Roblox Studio. |
When I made my first game it would have been really nice to know about the Play Here feature. Instead, I’d keep dragging the SpawnLocation across the map so I could play test different areas. It worked, but the Play Here would have saved me some time.
Playtest: Client and Server Toggle
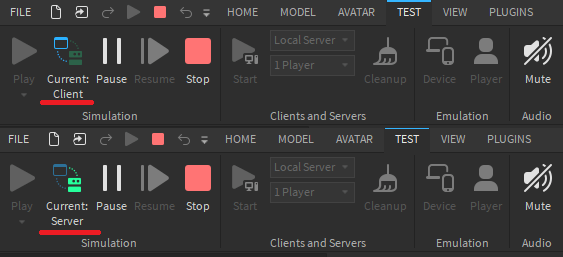
When you run a Roblox Studio test using Play or Play Here you will notice a new icon appears in the simulation area. Roblox Studio actually runs two simulations at once when using either of these options.
One simulation is for the client and one is for the server. This allows you to more accurately test the game experience of your players. You can easily switch between these modes by selecting the current button on the simulation.
Controls Between Client and Server
While in the client mode, you will have full control over your avatar and be able to play your game as your players will.
When choosing server mode, your character will still exist in the game server but you will have control of the free-floating camera like you do when you are in developer mode. You can select objects, view properties, and even make small changes to your keep.
If you make changes to your game while a playtest mode is active your changes will not save. So while you can add items to your game or modify a script while the playtest is running, those changes will all be deleted as soon as the playtest ends.
Explorer Window Between Client and Server
Another point I’d like to mention is that the items in your explorer window will change depending on whether you are viewing the game as a client or server.
In client mode, you will see items associated with your player. For example, you have a backup that might contain some starter items you give to your player. You might also have certain PlayerScripts that are added to each player for additional game features. All of these will show up when you select client.
In server mode, you will have access to see server-side objects. This includes ServerScriptService items and ServerStorage. These files are never accessible to clients for security purposes.
Multiple Client Testing
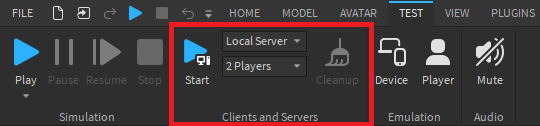
If you are making a multiplayer game then the Roblox Studio test using the Local Server is the most important option to know. I know this was a game-changer for me when I was making my first game.
The reason this is so powerful is that it lets you create multiple sessions, one acts as the server and the rest are clients. You can choose any number of players from 1 up to 8.
If you don’t see why this is so powerful let me give you an example. Let’s say in your game there is a sword that one player can pick up, and only one player. If you only test using the quick playtest options then it will always work. However, you need to script things differently for multiple players.
With multiple clients in your game, you can see from Player 2 and 3’s perspective what happens after Player 1 picks up the sword. Does it remain there or is it gone? It’s so important to test things like this before releasing your game to the public.
To actually start a Roblox Studio test using the multi-client you just select the number of players from the dropdown then click Start.
Unlike a Playtest, you won’t test the game in your normal Studio window. A number of windows will appear (1 server window + # of player windows). You can select any window you like depending on which player you want to be or if you want to view the server.
When you are done, select the cleanup icon to close the server and all the clients.
Team Testing
Roblox understands that sometimes you will have a lot of developers working on one game. That’s why they gave you a really neat option available in Roblox Studio called Team Test.
This testing option allows you to run and test your game with others. In our article on how to publish Roblox games, we learned exactly who we can share our game with and how.
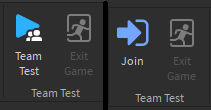
To find this option you’ll actually need to visit the Home Tab.
Assuming you’ve already shared your game you can click the Team Test button and it will launch a new game server for you. Then, anyone else who has been invited to collaborate with you can click the Join option in Roblox Studio. Now you and your collaborators can play the game together.
Remember, it’s not just other developers who can be collaborators. You can invite friends of yours to join or even members of your group.
This is a really powerful option for game developers.
Emulation: Different Devices
A lot of people play Roblox on mobile devices. Apparently, 78% of users play on mobile. You don’t have to make your game compatible with mobile, but if you want mobile players to join you should make sure they have a positive experience.
When creating mobile games the biggest difference between mobile and PC players is going to be the user interface. It might be a good idea to take some time and learn more about making your Roblox game mobile-friendly.
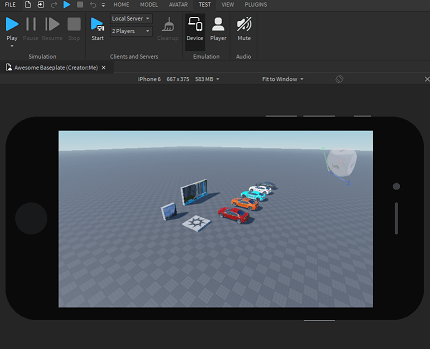
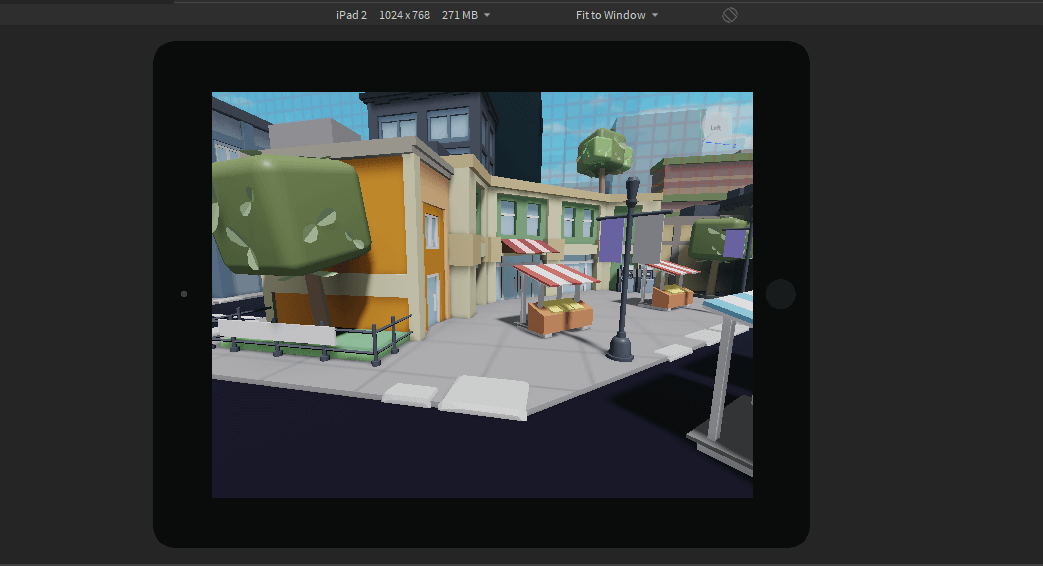
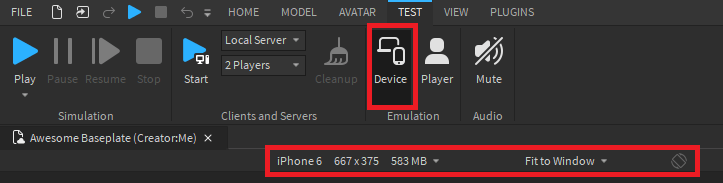
In the Roblox test tab select the device button. By default, this shows you how your game looks on an iPhone. You can switch the view from iPhone to tablet, test different desktop resolutions, and even console.
You can also rotate the screen so you can see how the game looks depending on how players hold their phone (horizontal vs vertical).
Another cool option is you can change the view window. It’s automatically set to fit to the window but you can change it to physical size or actual resolution.
If you have Graphical User Interface (GUI) elements in your game it is worth the time to try mobile testing. I know when I tested my game I was surprised by what I saw. I had to spend time learning about making GUI elements scale properly and look good on all devices.
Emulation: Player Profiles

Player profiles are a part of Roblox Studio testing tools that I personally have not used before. This will be most useful for developers that are creating games that will be localized for different languages.
If that sounds like something you need for your game then click the Player icon in the emulation category within the test tab.
A new window will appear called PlayerEmulator. Now toggle on the Enable Test Profile option in the new window. The emulation profile will remain active once you toggle this feature on, even if you close this window.
The locale dropdown lets you emulate the localized language you choose while playtesting.
The region dropdown lets you emulate the player’s country/region while playtesting. Different regions might have different rules they follow as compared to your home region.
Once you’ve chosen your player settings, use the Play or Play Here test options to see these settings live in your game.
Saving Data While Testing
When testing your game in Roblox Studio you may want to think about how your test data might impact your game. This is something I learned from my own experience.
If you are just saving data for each player and never displaying it to the server through an in-game leaderboard part or through the leaderstats, then it’s not a big issue.
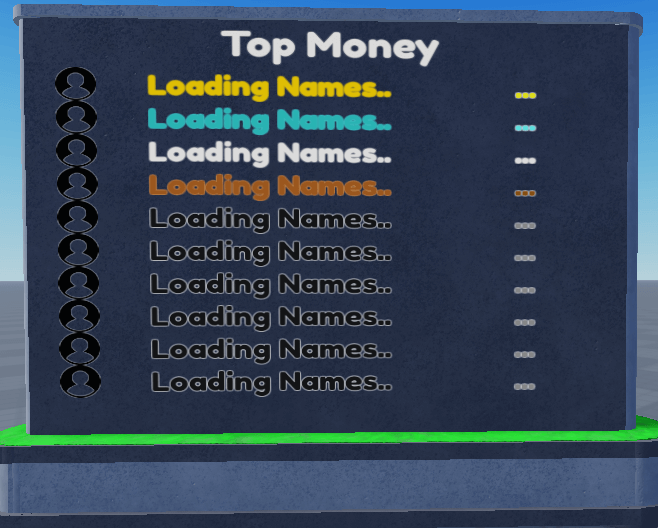
If you are planning on using a leaderboard to display the top 10 players or the default leaderstats display you might need to write a few lines of code. The reason is that a test account might have 1 million points but real players have only ever achieved 100 points. If they see the test account numbers they may be confused.
Before we write the code we’d need to get the player(s) UserId. The UserId is different depending on if you are using Playtest or the Local Server to test.
Playtest Local UserId
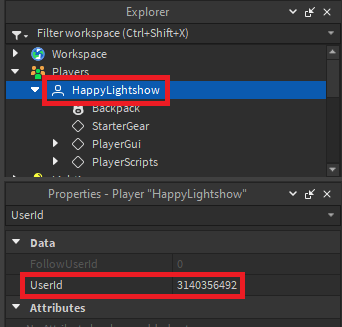
If you are testing through Roblox Studio locally using the Play and Play Here options you will load into the game as your avatar. Any data that is saved for your player will be saved as your UserId.
In this case, you would want to write a check for your UserId and either prevent that data from saving or displaying.
--This code stops the scripts execution if the UserId equals the specified Player's UserId
if Player.UserId ~= 3140356492 then continue end
Local Server UserId
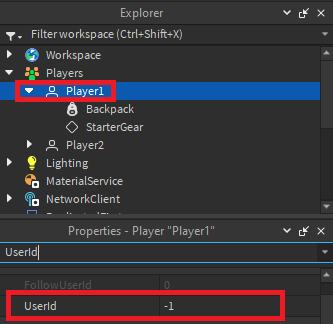
If you test using a server then you enter the game as Player X where X is the number of the player that you are. Remember you can have up to 8 players so you might be Player1 or maybe Player5.
When using the Local Server all players have a UserId less than 0. This means all of the UserIds are negative numbers starting with -1 then -2, -3, etc.
For this code, you would check to make sure the UserId is less than 1. Then, either prevent that data from saving or displaying.
--This code stops the scripts execution if the UserId is less than 1
if Player.UserId < 1 then continue end
Do You Really Have To Do This?
No. You don’t have to restrict your data if you don’t want to. This is just one option that I found helpful. You could also write a script that finds these UserId’s and deletes or resets their data. There are plenty of options and in the end the best one is up to you.
Roblox Studio Game Testing Guide
Now you should have a good understanding of the test options available in Roblox Studio. I highly recommend playtesting your game as much as possible before you share it with others. You might only have one chance to impress a potential player. If you have limited time to test I’d say make sure, more than anything, that your starting experience is bug-free.
If you found this article helpful then you should also check out our list of the best Roblox assets packs for new developers.
We also offer a free course that teaches you how to create games on Roblox. We provide step-by-step instructions on writing scripts, modeling in Roblox Studio, saving data, adding timers and leaderboards.
 Learn Roblox Studio